Getting started with OpenTUMFlex
OpenTUMFlex is an open-source flexibility estimation model that quantifies all possible flexibilities from the available prosumer devices and prices them.
To test and execute your OpenTUMFlex model, this chapter explains about the Python installation procedure and enabling virtual environments.
Installation
OpenTUMFlex is an open-source model developed using Python programming language and uses additional packages such as Pyomo, Matplotlib, etc., to enable its functioning. This section explains the step-by-step procedure to install Python IDE and run your first OpenTUMFlex example.
Python IDE
To use Python programming language you require an integrated development environment (IDE). We recommend you to use one of the following IDEs to run OpenTUMFlex.
Pycharm 2020 or later: Community or Professional edition
Spyder 4 or later: Miniconda or Anaconda version
Solver
To enable Mixed Integer Linear Programming (MILP) optimization, OpenTUMFlex can use GLPK, CPLEX, Gurobi or any other MILP solvers which are supported by Pyomo. By default, the OpenTUMFlex optimization runs using GLPK.
- Installing GLPK
Go to GNU Linear Programming Kit (GLPK) website.
Copy the pip command and run it using Anaconda or command prompt.
In case you have any trouble in your installation, the following video can help you.
- Installing Gurobi (for students and researchers)
Go to Gurobi website and create an account with your university email.
When the account has been activated, log in and download the newest Gurobi solver.
Go to Academia->Academic Program and Licenses
Follow the installation instructions under “Individual Academic Licenses” to activate your copy of Gurobi
Clone repository
You may use anyone of the following methods to clone the OpenTUMFlex repository to your local drive.
Directly download to a local directory of your choice.
Use version control tools such as GitHub Desktop, Sourcetree, GitKraken, etc.
Use pure Git link
git clone https://github.com/tum-ewk/OpenTUMFlex.git
Virtual environment
To install all the required packages, the easiest way is to use a virtual environment.
Shift to the local directory where OpenTUMFlex is to installed cd "Local directory path"
Pycharm - Python 3.9.
Create the virtual environment:
open "Anaconda Prompt" -> conda env create -f environment_v1.0.ymlActivate the virtual environment:
In the command prompt type conda activate OpenTUMFlex
Go to Project interpreter
File->Settings->Project->Python InterpreterNow add an environment
Add->Conda Environment->Existing environment->Select folder->OK
Spyder - Python 3.7
Create the virtual environment:
open "Anaconda Prompt" -> conda env create -f environment_v1.0_py37.ymlActivate the virtual environment:
In the command prompt type conda activate OpenTUMFlex_py37
A new Spyder IDE application will be installed and can be found in the start menu.
Note
Spyder while writing this documentation doesn’t support Python 3.9 which is originally used in our enviroment file, we have added an additional enviroment file to support Python 3.7 for Spyder IDE.
Test your installation
Run the example.py file to test if the OpenTUMFlex model is correctly installed. If the installation was succesful, you will see the following results:
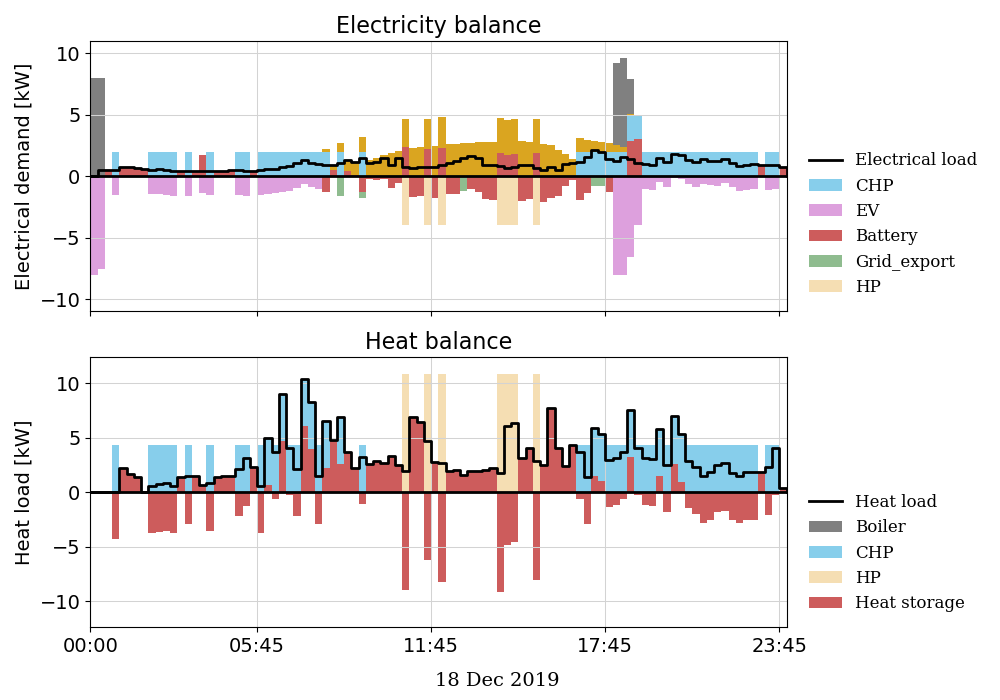
Figure 1: Electrical and heat load balance
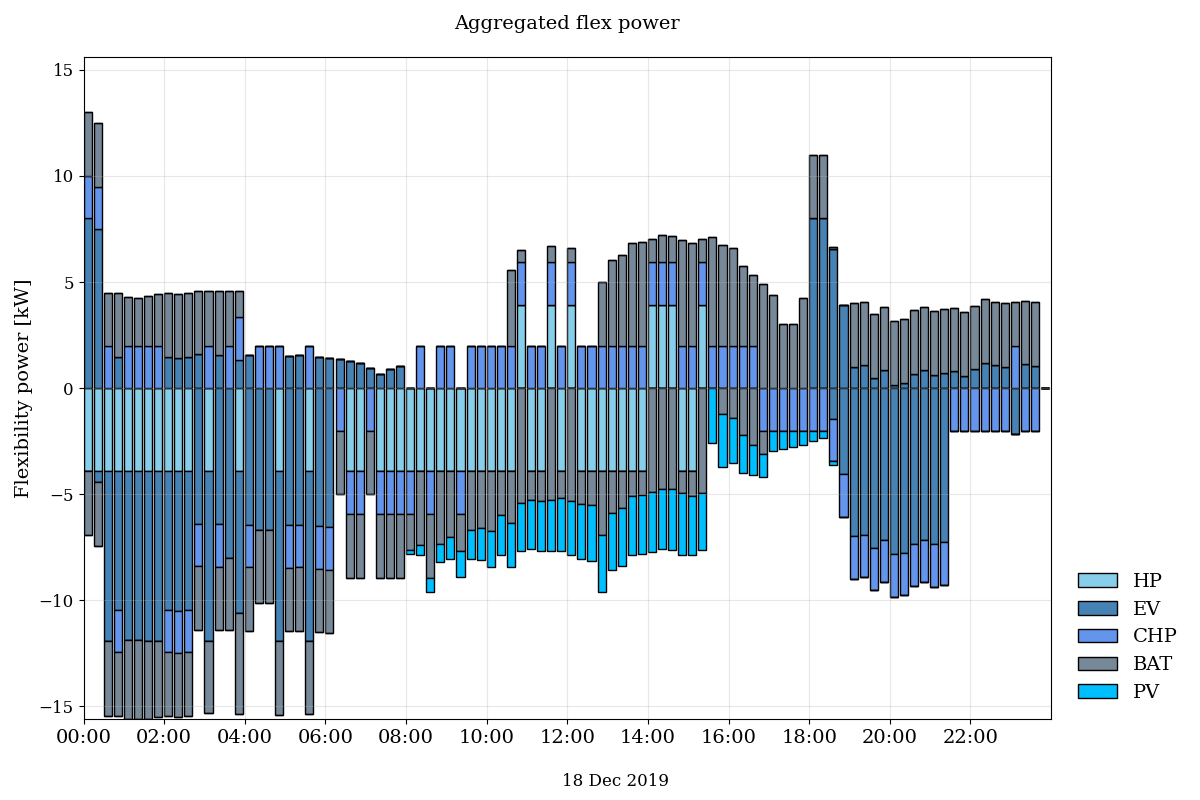
Figure 2: Aggregated flexibility for all the devices
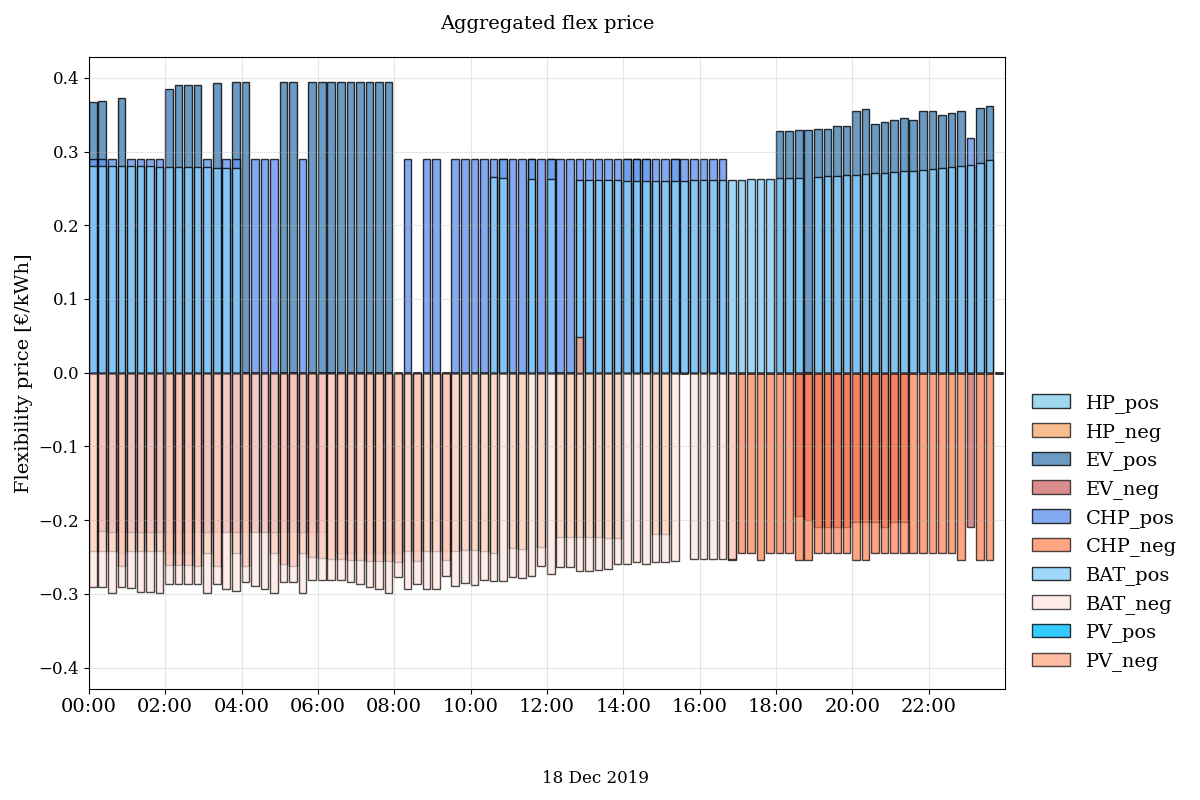
Figure 3: Aggregated flexibility price